

This post can contain affiliation links. Please read my privacy policy.
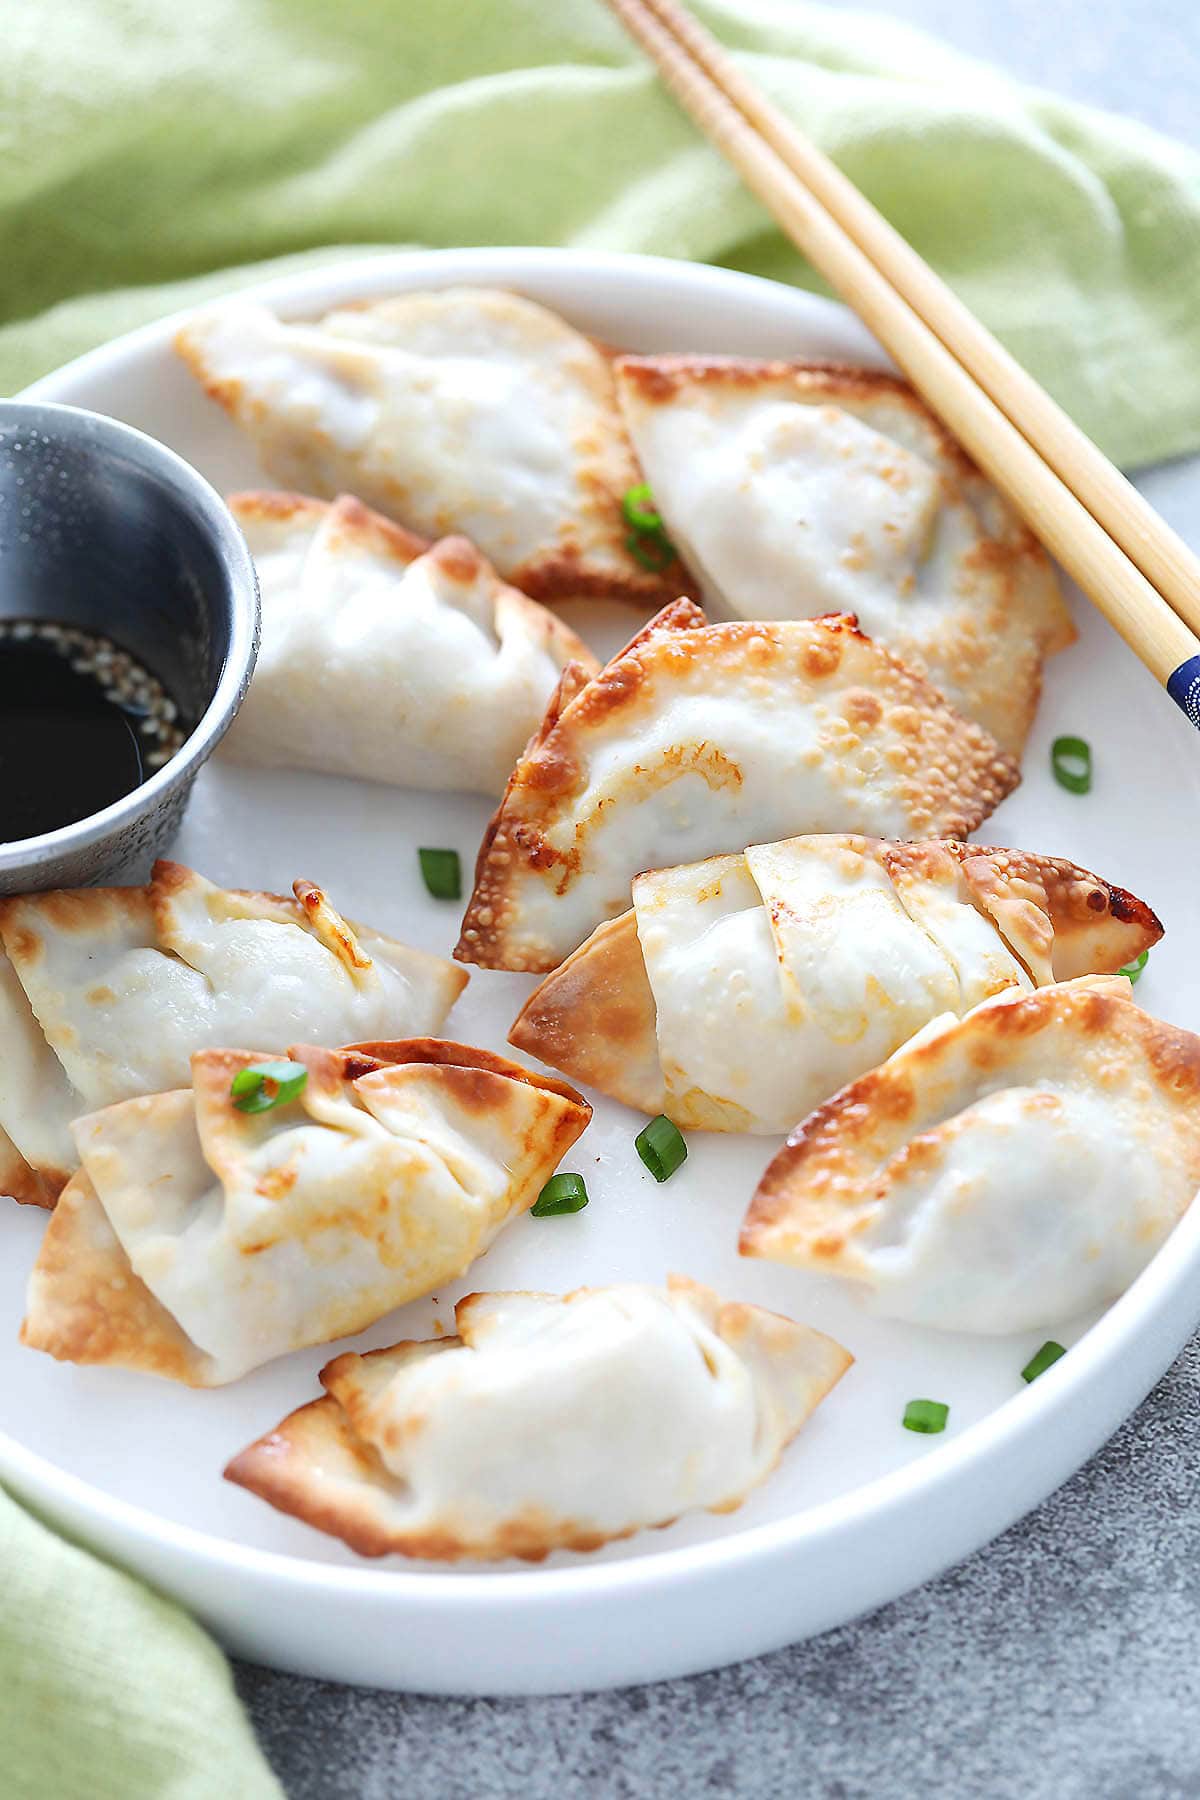
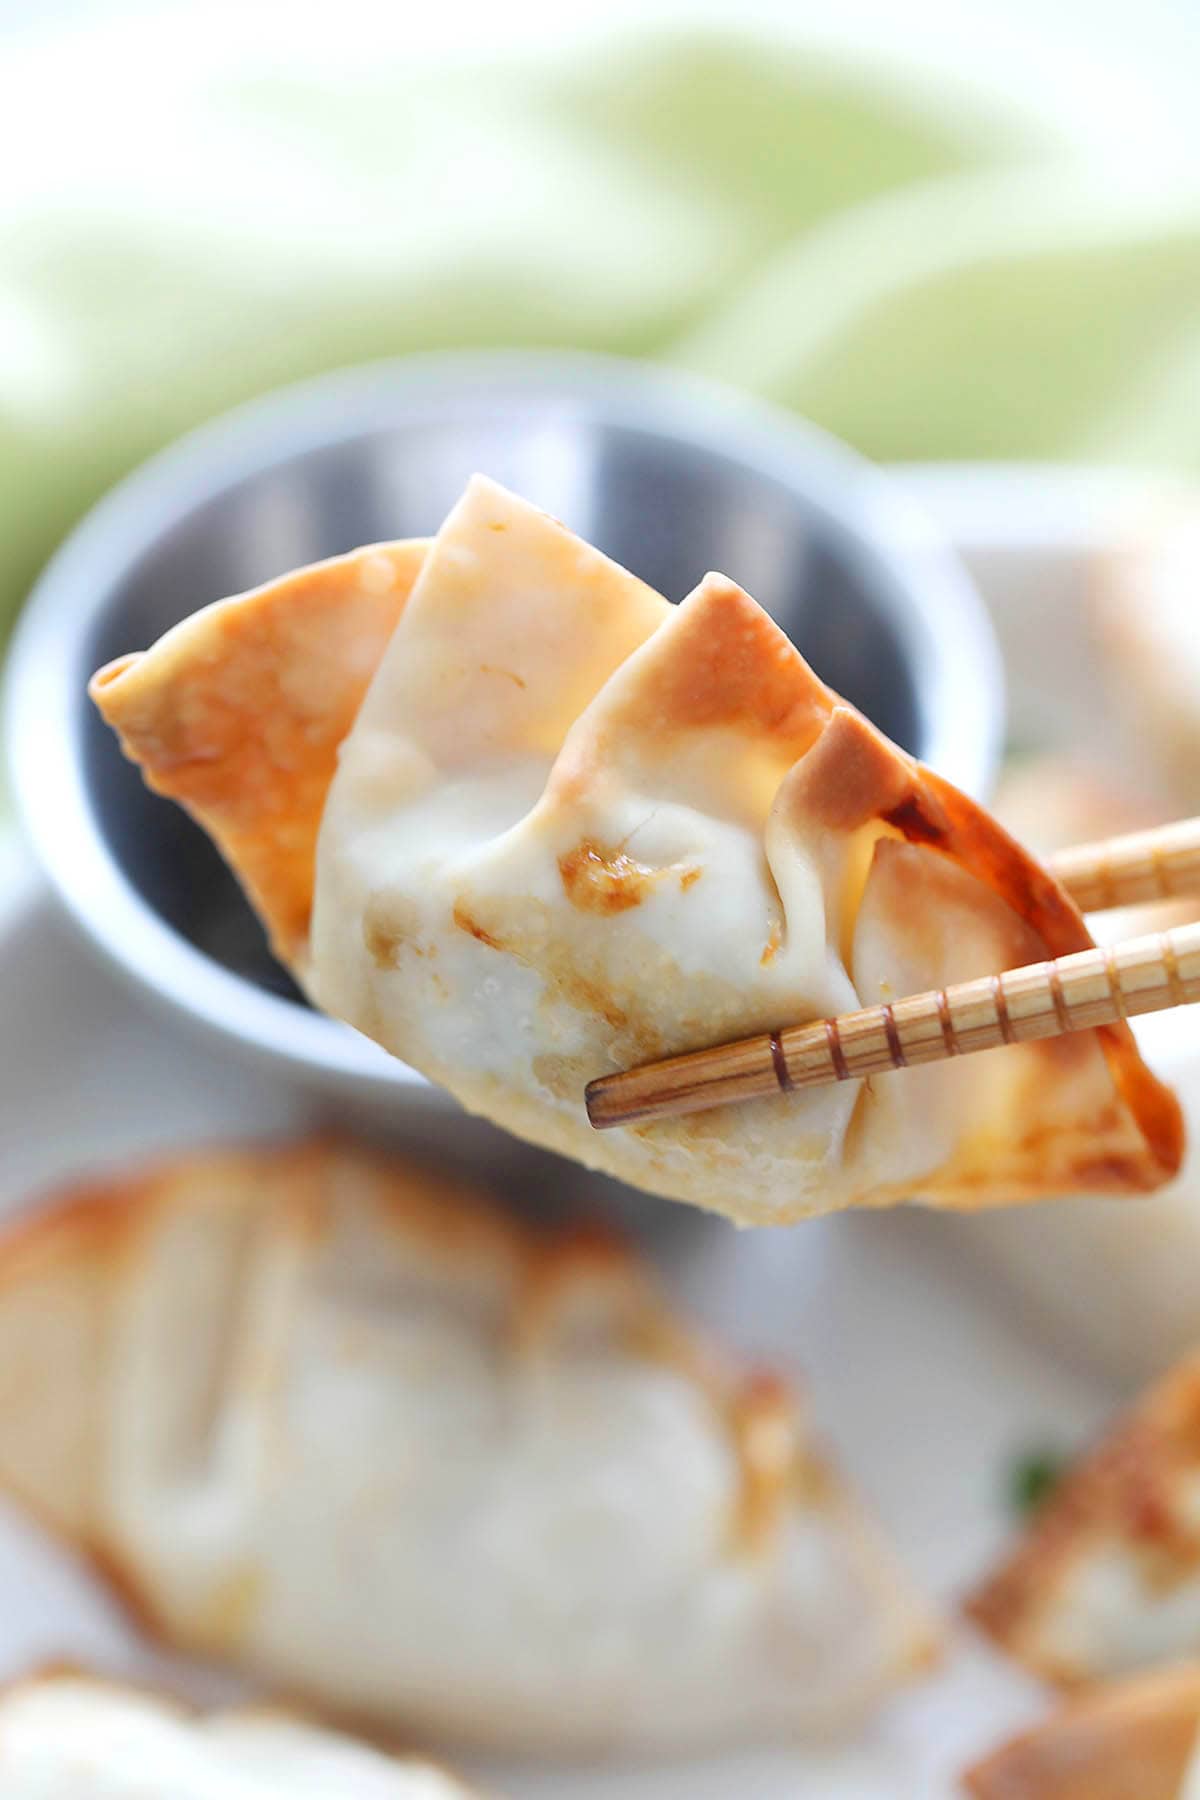
These Easy Gyoza fryer They are full of juicy pork and turn golden and crunchy in just 8 minutes: no pan, no mess. By spending, to make the freezer and full of flavor, they are perfect for the investigated weekdays or every time you need a quick and satisfactory bite.
Gyoza recipe crunchy fryer
I will be honest: once I started doing Gyoza in the fryer, I stopped frying them completely. These gnocchi come out perfectly golden and crunchy, with juicy pork filling and sketches or babysitter is not necessary. It is the easiest way I know to get that irresistible crunch without heating a pan or making a mess.
The filling is a simple mix of ground pork, cabbage, ginger, shallot and a splash of soy and sake sauce, enough enough to bring out the salted flavors without overwhelming the dumpling. Usually I fold a small batch when the cravings hit, but you can make a large batch in front and freeze them too. Just fry the air directly from Frozen and you have crunchy, Homemade Gyoza In a few minutes. Serve with ponzu sauce or chilli oil: once you try in this way, you will never return back. Make sure to check my video guide and suggestions below to make them right.
Ami Gyoza? You have to try my shrimp Gyoza or pig and shiitake Gyoza: they are fried to crunchy perfection. However, you can fry them!
What makes this recipe so good

If you love crunchy gnocchi but you hate the mess and cleanliness, this recipe of the fryer is your new best friend: Golden, juicy and super simple.
- Perfect golden crew every time. The fryer gives you that crunchy bottom and a tender wrapping.
- Juicy and tasty filling. A simple pork mixture, cabbage and fragrant condiments that keep every bite satisfactory.
- Ready in no time. Crunchy and delicious in just 8 minutes, perfect for fast dinners or every time the cravings hit.
- Infinite immersion options. Serve with Ponzu, Chinese black vinegar, chilli oil or any sauce you love. They have an equally good flavor without immersed sauces!
Ingredients you need
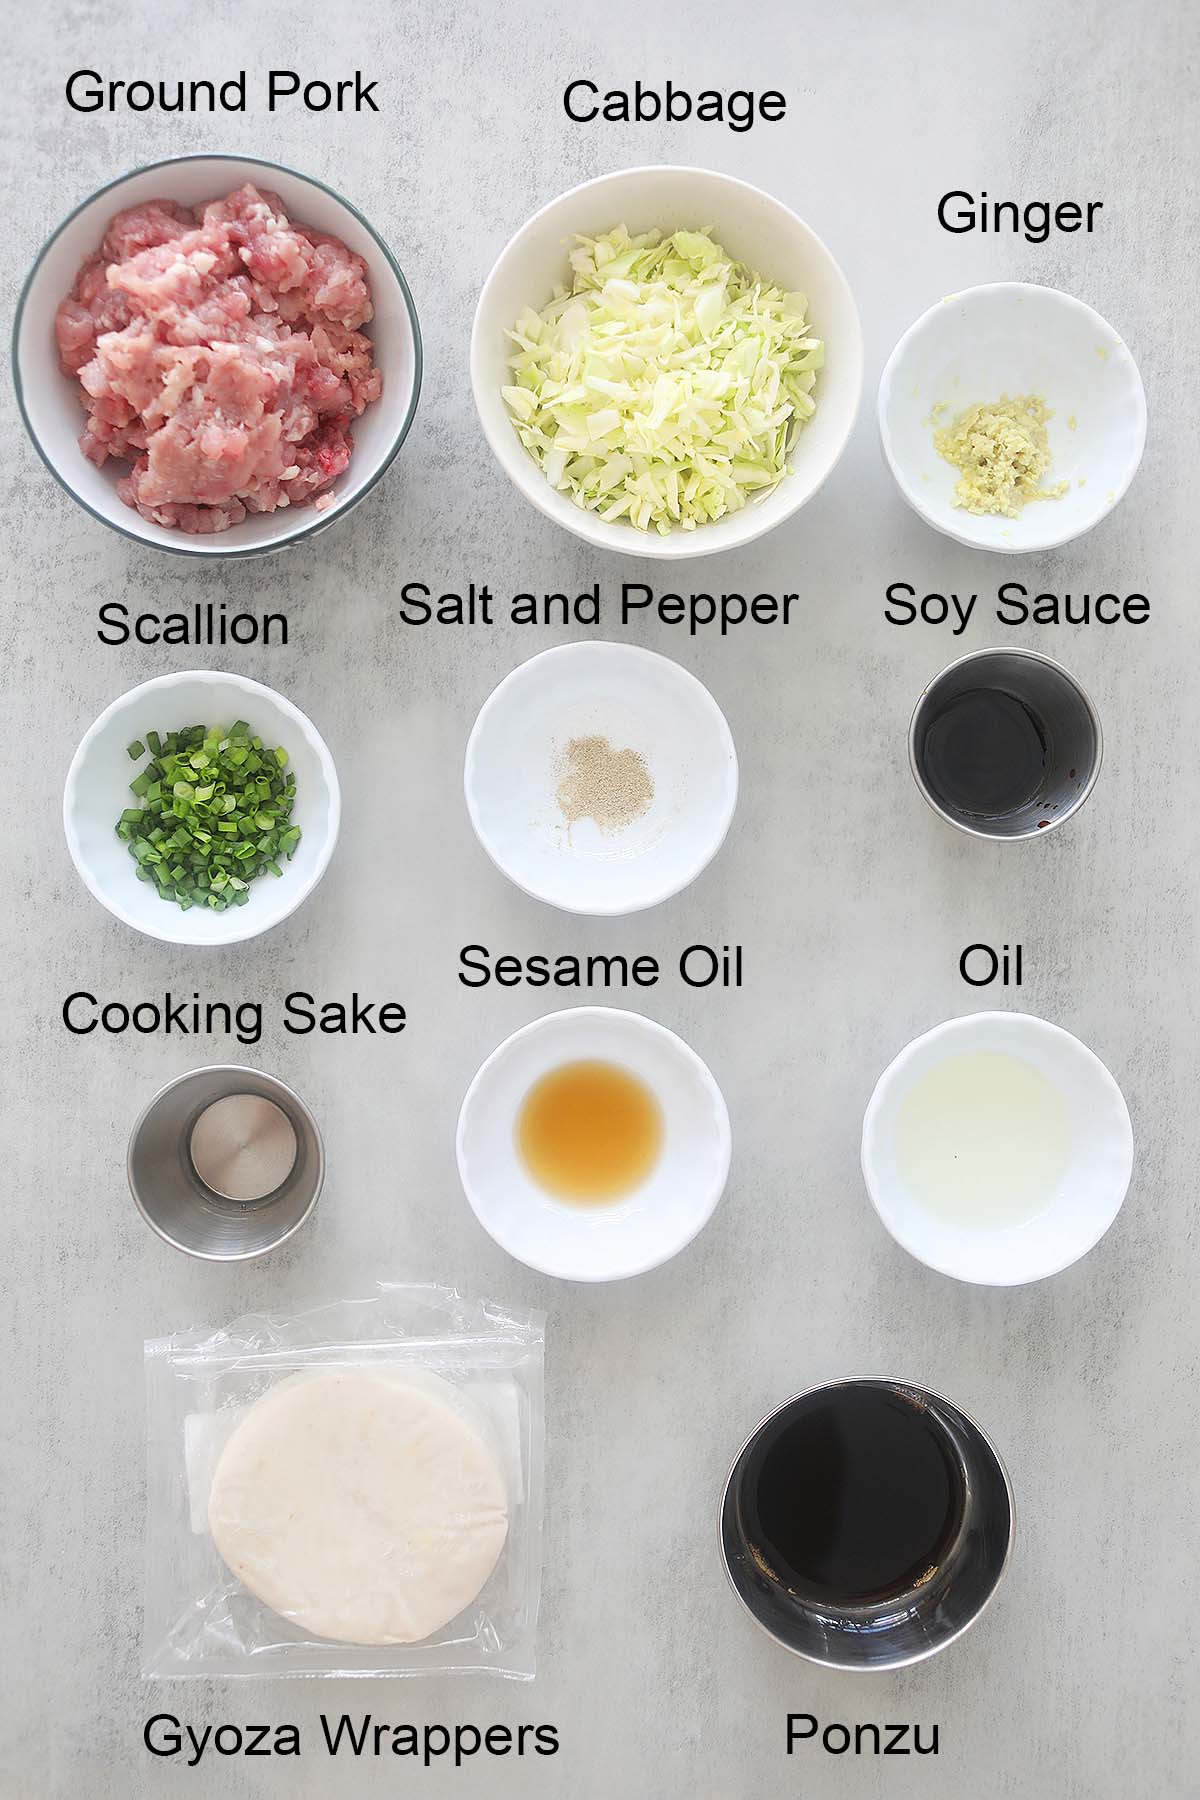
- Ground door: choose the pork with about a fatty ratio 80/20. You can use ground chicken, but it won’t be so juicy. Avoid ground turkey: it is usually too dry.
- Cabbage
- Ginger
- I am sauce
- Cooking: it is better to stick to cooking the sake, but if you don’t have it, you can exchange it with shaxing wine, Chinese rice wine or dry sherry.
- Giovallo Gyoza Wrapper/Pastry
Check the recipe card below for all the details on the ingredient.
Pro #1 suggestion: because I use pork pork on the ground 80/20
I go to ground pork which is about 80% of meat and 20% fat because it keeps the filling juicy and tasty. If it is too thin, the Gyoza can prove dry and nobody wants it.
Pro #2 suggestion: the round wrappers make the fold easy
I use round wraps because they are easier to bend and seal, therefore not losses and perfectly in the shape of each time.
Pro pro #3 test: brushing the oil for crunchy and golden wraps
Brush some oil on both sides before the frying of air helps the wraps to become crunchy and golden, without deep fry, without confusion.
Shopping guide: Search for round and thin tagotted wraps “Japanese pasture Gyoza“Or simply”Gyoza envelope“In your local Asian or online market. They are soft and flexible, ausorial to be folded without tearing. If you cannot find the japanese Chinese gnocchi wraps or potsticker casing are a good backup, choose only the round ones that are not too thick. Avoid Wonton’s wraps which are usually pale yellow.
How to prepare the Gyoza fryer
Launch the ground pork, cabbage, ginger, shallot, salt, pepper, soy sauce, cooking sake and sesame oil In a bowl. Mix really well so that all those flavors know each other.
Sidenote: Traditionally, in Japanese cuisine, they mix the filling by hand: it helps everything merge better and keeps the pig tender. But do not underline if you use a spoon; It still works perfectly.
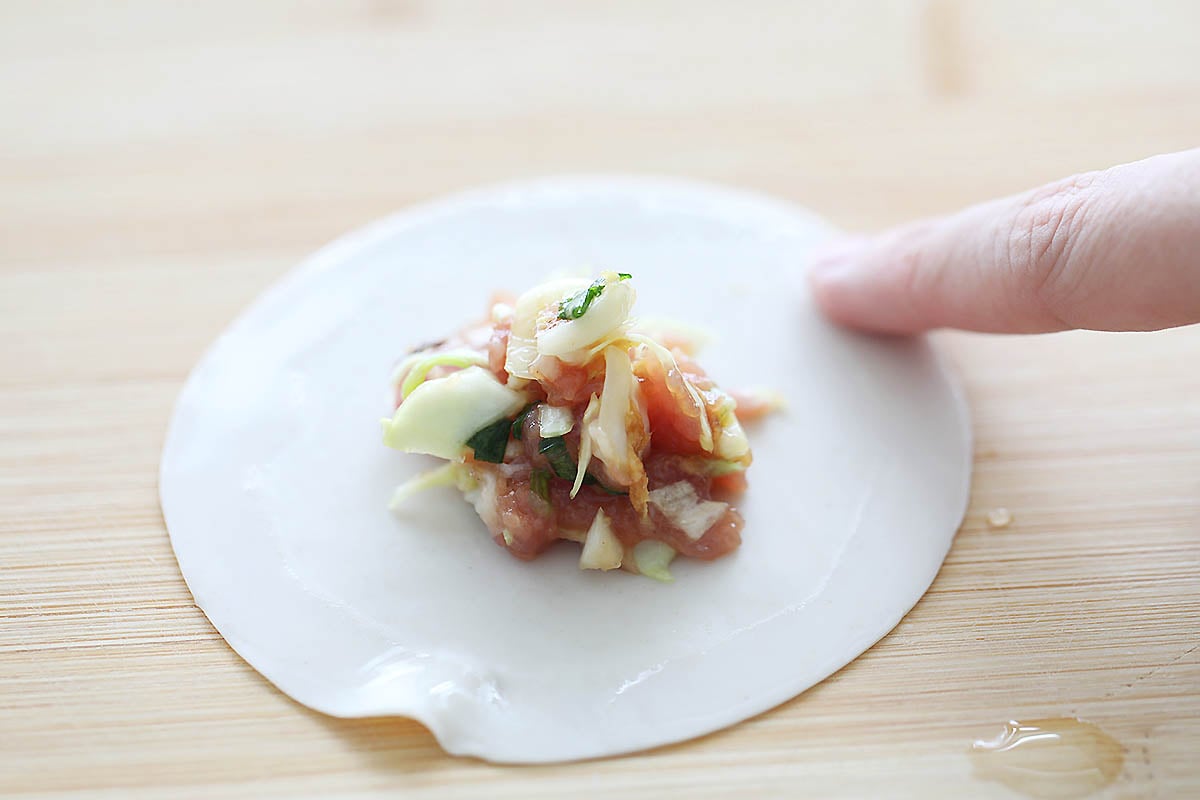
Grab half a teaspoon of filling and let it say right in the CEnter every wrapper. Then, wet the edges With a little water that uses the finger, this helps to seal them. Fold the wrapping and fold the edges To block everything. Continue until you have concluded all your gnocchi.
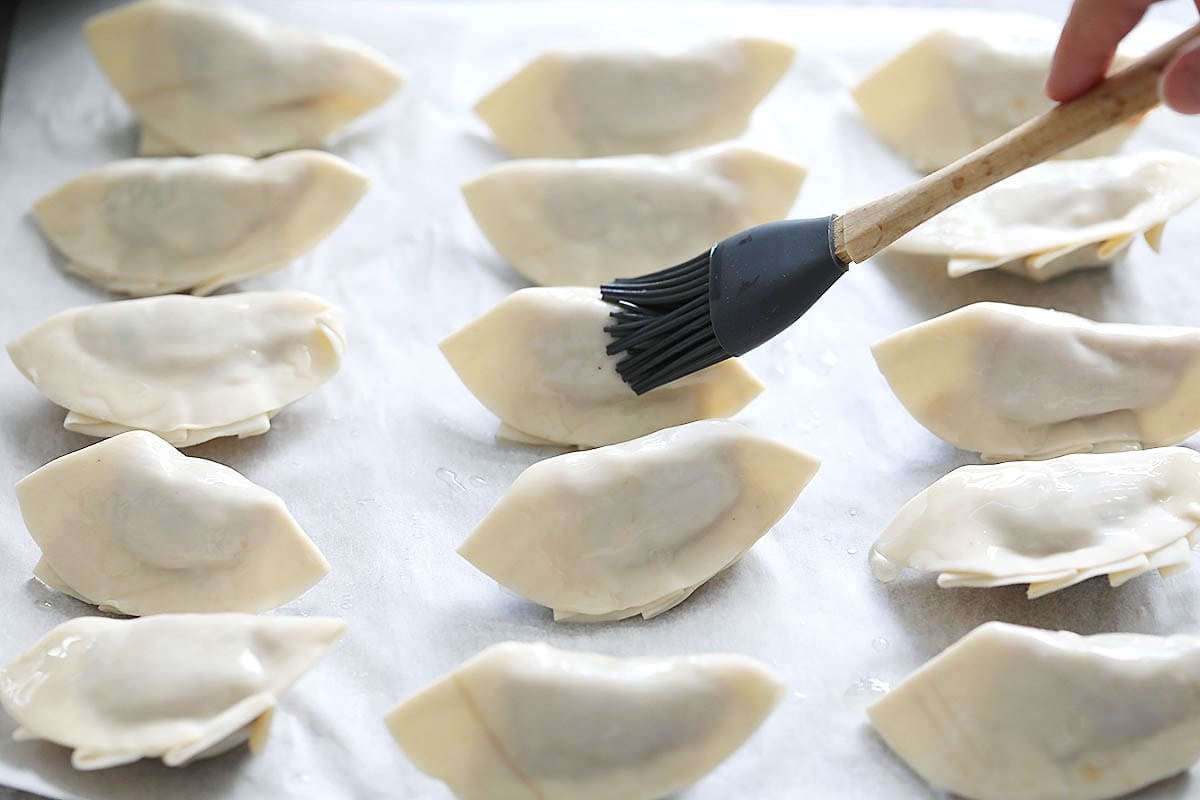
Arrange your Gyoza on a piece of parchment paper. Give the peaks a Light oil brushSo turn them upside down and do the same on the other side. This small step helps to get that perfect crunchy golden when you fry them.
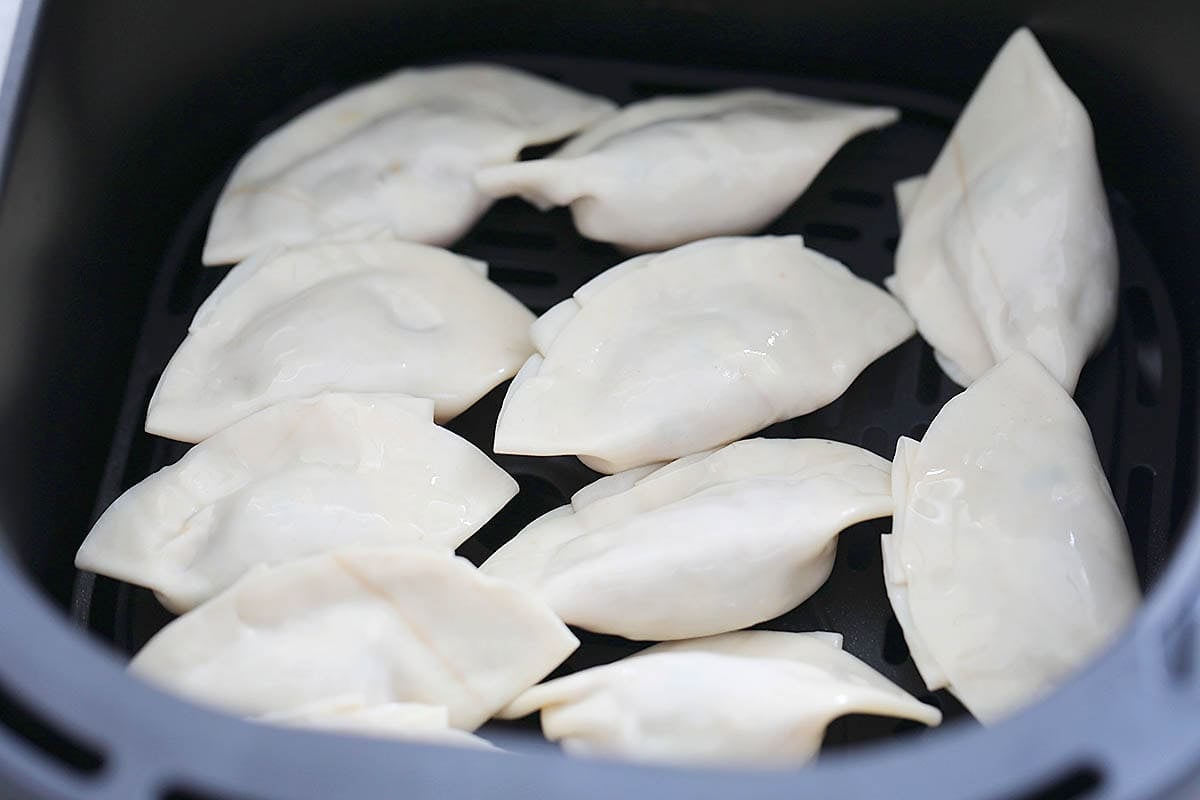
Put the Gyoza flat side upwards In a single layer in the fristed basket. If fresh, fry 190 ° C (375 ° F) for about 4 minutes. If you cook frozenfrom theirs 5 minutes For that perfect golden crunch!
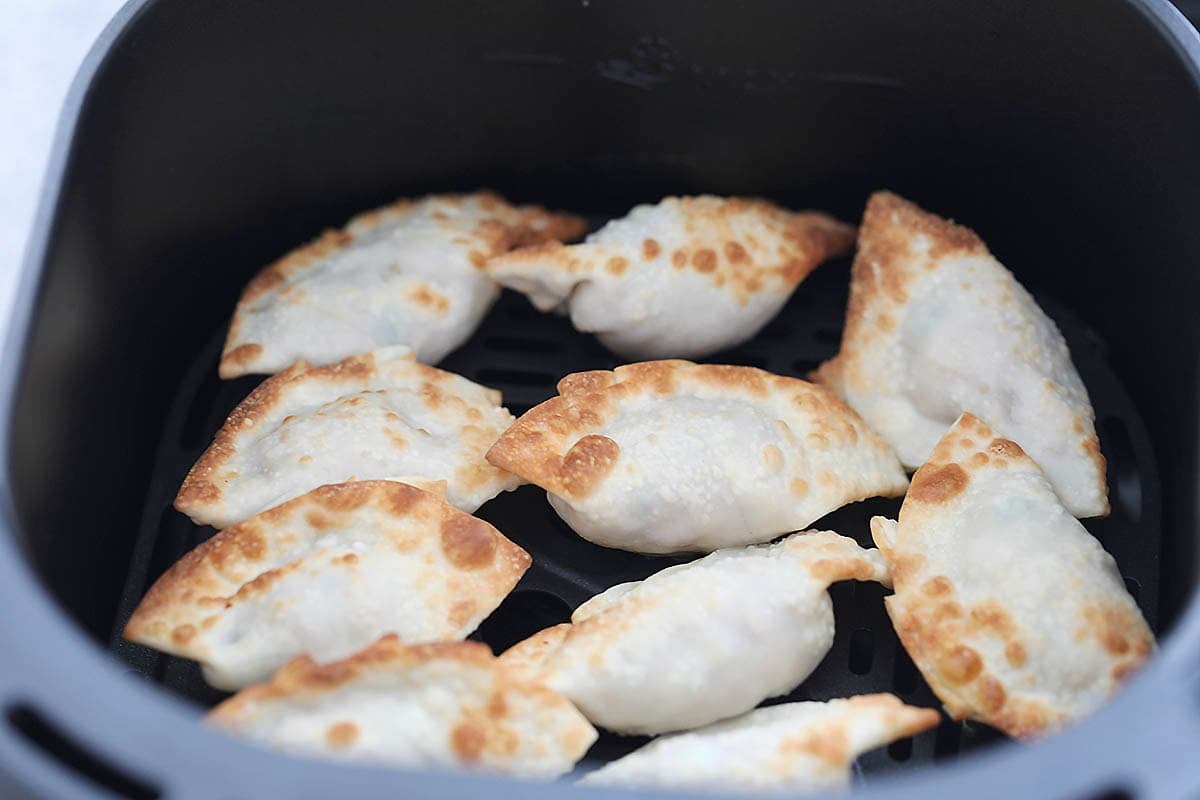
Turn upside down the Gyoza Air fry them 190 ° C (375 ° F) for another 4 minutes Until they are golden and crunchy. If you are cooking frozenjust give them 5 minutes On this side instead.
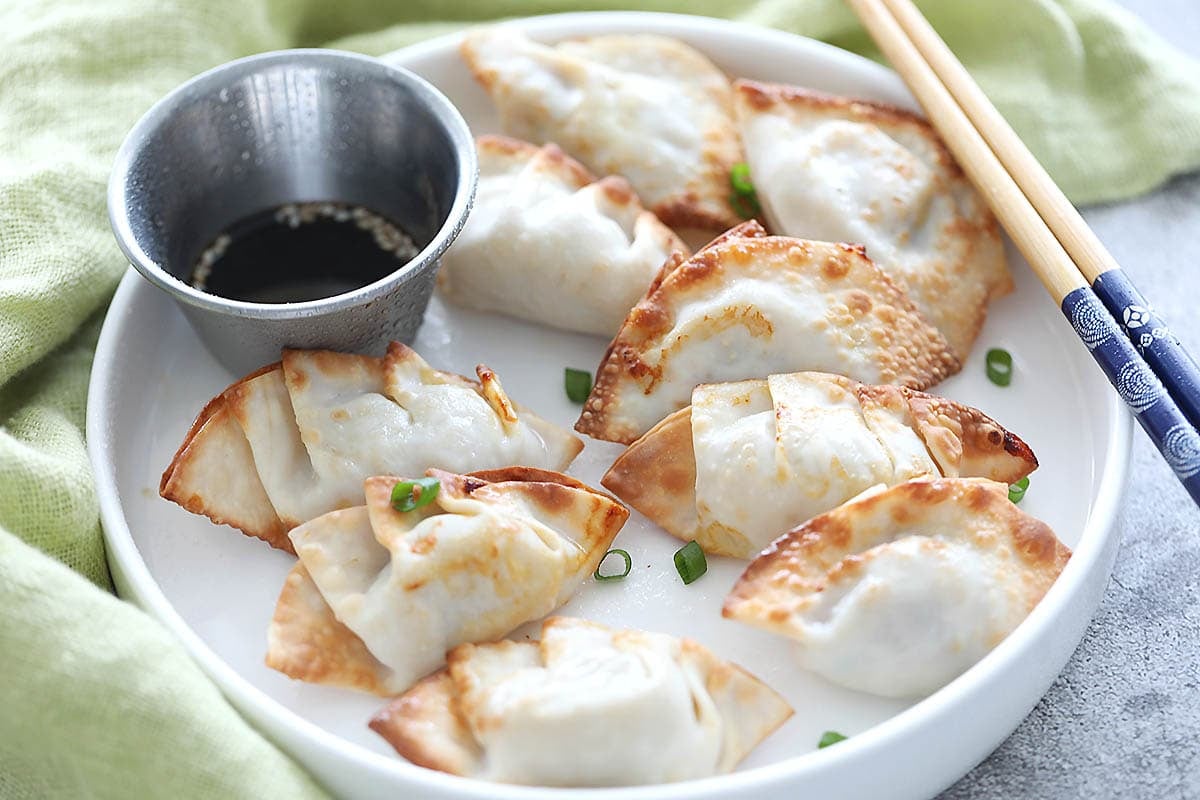
Enjoy your crunchy hot and fresh Gyoza: give them in a little ponzu sauce and dig!
How to wrap Gyoza
Walking Gyoza at home is a fun and satisfactory way to enjoy these delicious gnocchi, especially when using comfortable Gyoza wraps purchased in the shop.
With just a little filling and a simple folding technique below, you can create gnocchi wonderfully full of fry for frying, smoking, boiling or frying. I love this activity in the kitchen because it helps me to relax, concentrate and have fun doing something with my hands, it is also fun when you make a big lot with family and friends and share time together.
Step 1: Place a piece of Gyoza wrapping on a flat work surface and place a teaspoon of filling in the center.
Passage 2: Buffer the index finger in the water and moisten the edges of the Wrapper.
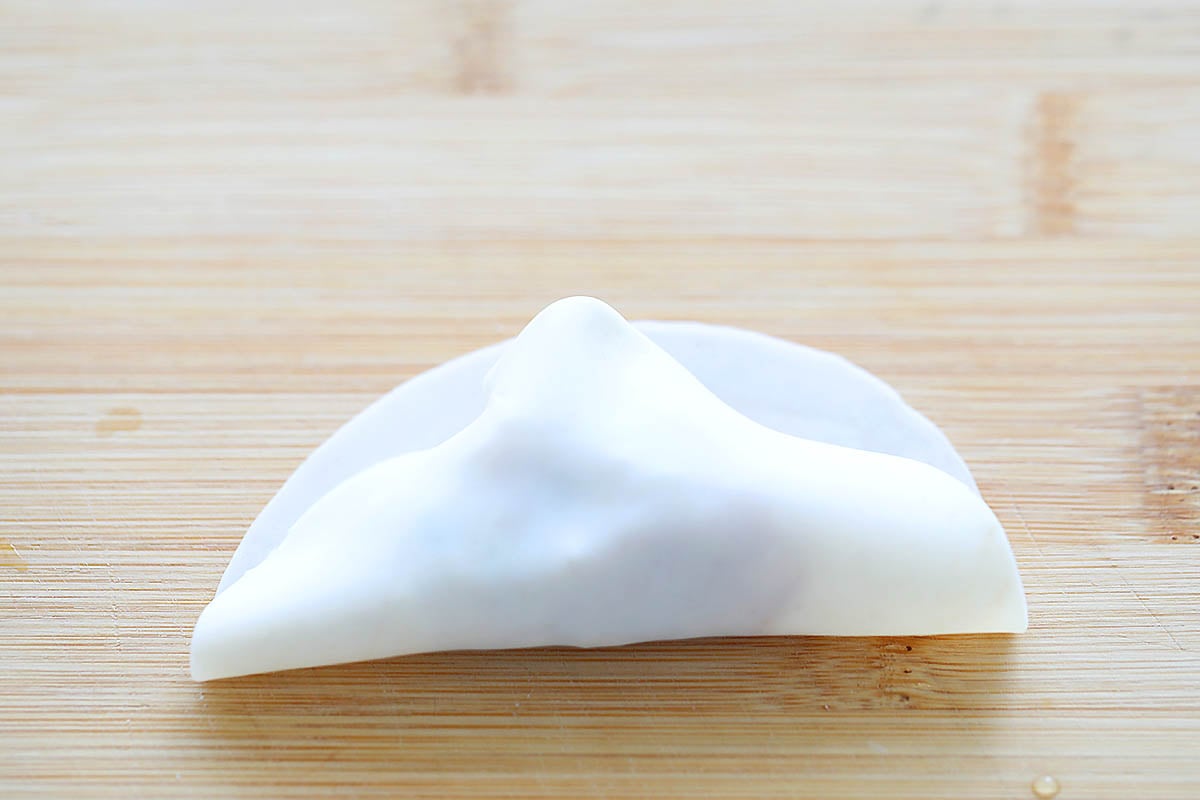
Step 3: Gently fold it in half and prepare to form the beautiful folds.
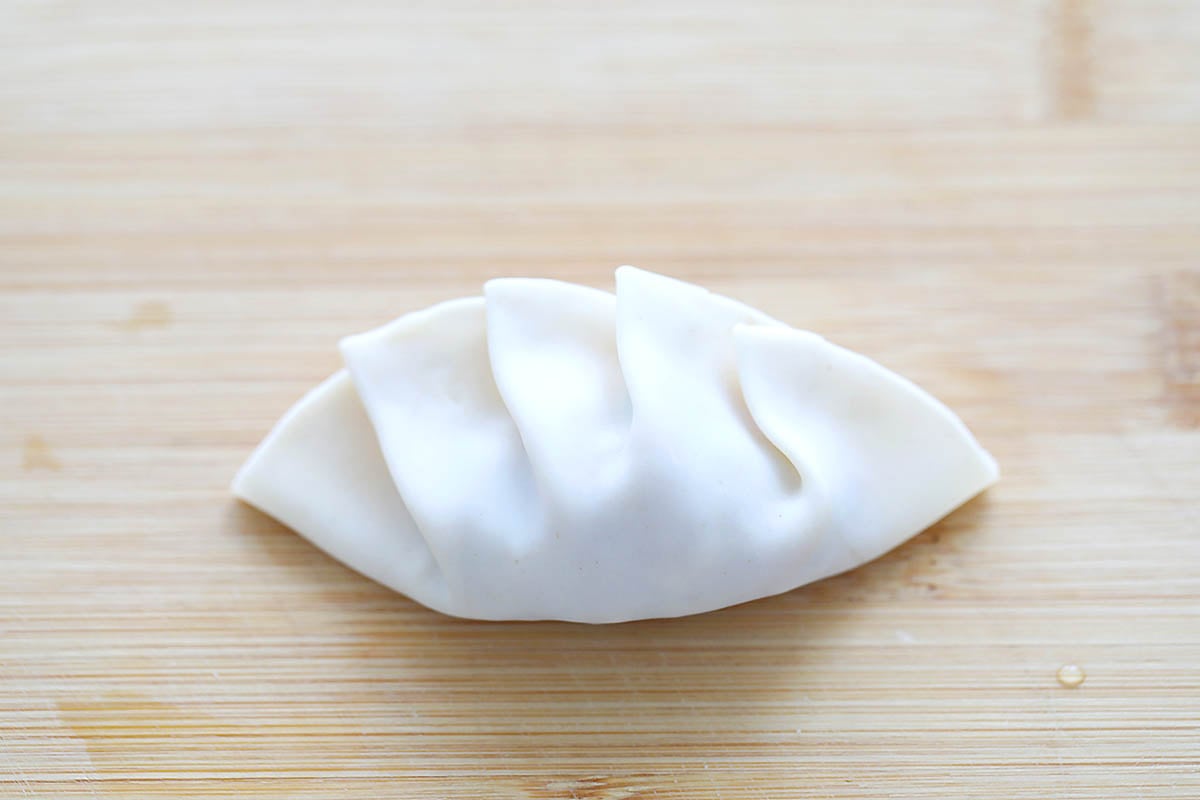
Step 4: Using the thumb and index, fold and pinch the envelope to form the folds. If you are a beginner, try to do three to four folds. Pizzica firmly to seal, making sure there are no gaps or losses.
How to freeze Gyoza for fast meals
Freezing these means that there is always a quick and tasty meal ready for use. Place the raw Gyoza in a single layer on parchment paper: of course they are not touching. Freeze for 1-2 hours until it is stopped, then transfer to a hermetic bag or container.
When ready to cook, there is no need to defrost. Fry the air straight from Frozen for a total of 10 minutes, launching halfway (5 minutes per side). This gives Gyoza crunchy and golden every time.
Frequent questions
YES. Prepare the filling up to a day before, keep it covered in the refrigerator, then assemble the pieces when it is ready to cook.
No, don’t stack them. They need space and air flow for crunchy correctly. This recipe produces 24, but I was able to adapt only to 12 in my fryer, so I cooked them in two lots.
No problem. It is already in the passages. Only make sure that both sides are brushed with a little oil and arrange them in a single layer so that they are not touching. In this way, they stop well without attacking or tearing.
Keep all the pieces cooked in an airtight container in the refrigerator for a maximum of 2 days. Heated in the air fryer at 190 ° C (375 ° F) for 2 minutes, just enough to warm them and care without burning.
This recipe is 89 calories for Gyoza.
What to serve with this recipe
For an easy and healthy dinner of the week, I recommend the following recipes:
I hope you like this post as much as me. If you try my recipe, leave a comment and consider it a 5 -star evaluation. For easier and more delicious recipes, explore my recipe index and stay updated by subscribing to my newsletter and following me Facebook, PinterestAND Instagram For new updates.
Other recipes of fryers that might like you
Prevent the screen from becoming dark
-
In a bowl, add ground pork, cabbage, ginger, shallot, salt, pepper, soy sauce, kitchen sake and sesame oil. Mix until well combined.
-
Place about 1/2 teaspoon of filling in the center of each Gyoza envelope. Moisten the edges with water using the finger. Fold and fold to seal. Repeat with the remaining wraps.
-
Put the Gyoza on a piece of parchment paper. Lightly brush the peaks with oil, then turn the turn and brush the other side.
-
Arrange the flat side of Gyoza in a single layer in the frisitor basket. Fry the air at 190 ° C (375 ° F) for 4 minutes (or 5 minutes if cooking from frozen).
-
Top the Gyoza and fry at 190 ° C (375 ° F) for another 4 minutes (or 5 minutes if cooking from frozen), until it is golden and crunchy.
-
Enjoy the heat Gyoza with Ponzu sauce to immerse yourself.
Refer to the post on how to wrap Gyoza with the Passo-Passo image guide.
Service: 24gnocchi, Calories: 89Kcal, Carbohydrates: 11G, Protein: 4G, Fat: 3G, Saturated fat: 1G, Polynsaturo fat: 1G, Monolysatuine fat: 1G, Trans fat: 0.003G, Cholesterol: 8mg, Sodium: 213mg, Potassium: 50mg, Fiber: 0.4G, Sugar: 0.1G, Vitamin A: 8Iu, Vitamin C: 1mg, Soccer: 12mg, Iron: 1mg
Nutritional information is calculated automatically, so they should be used only as approximation.